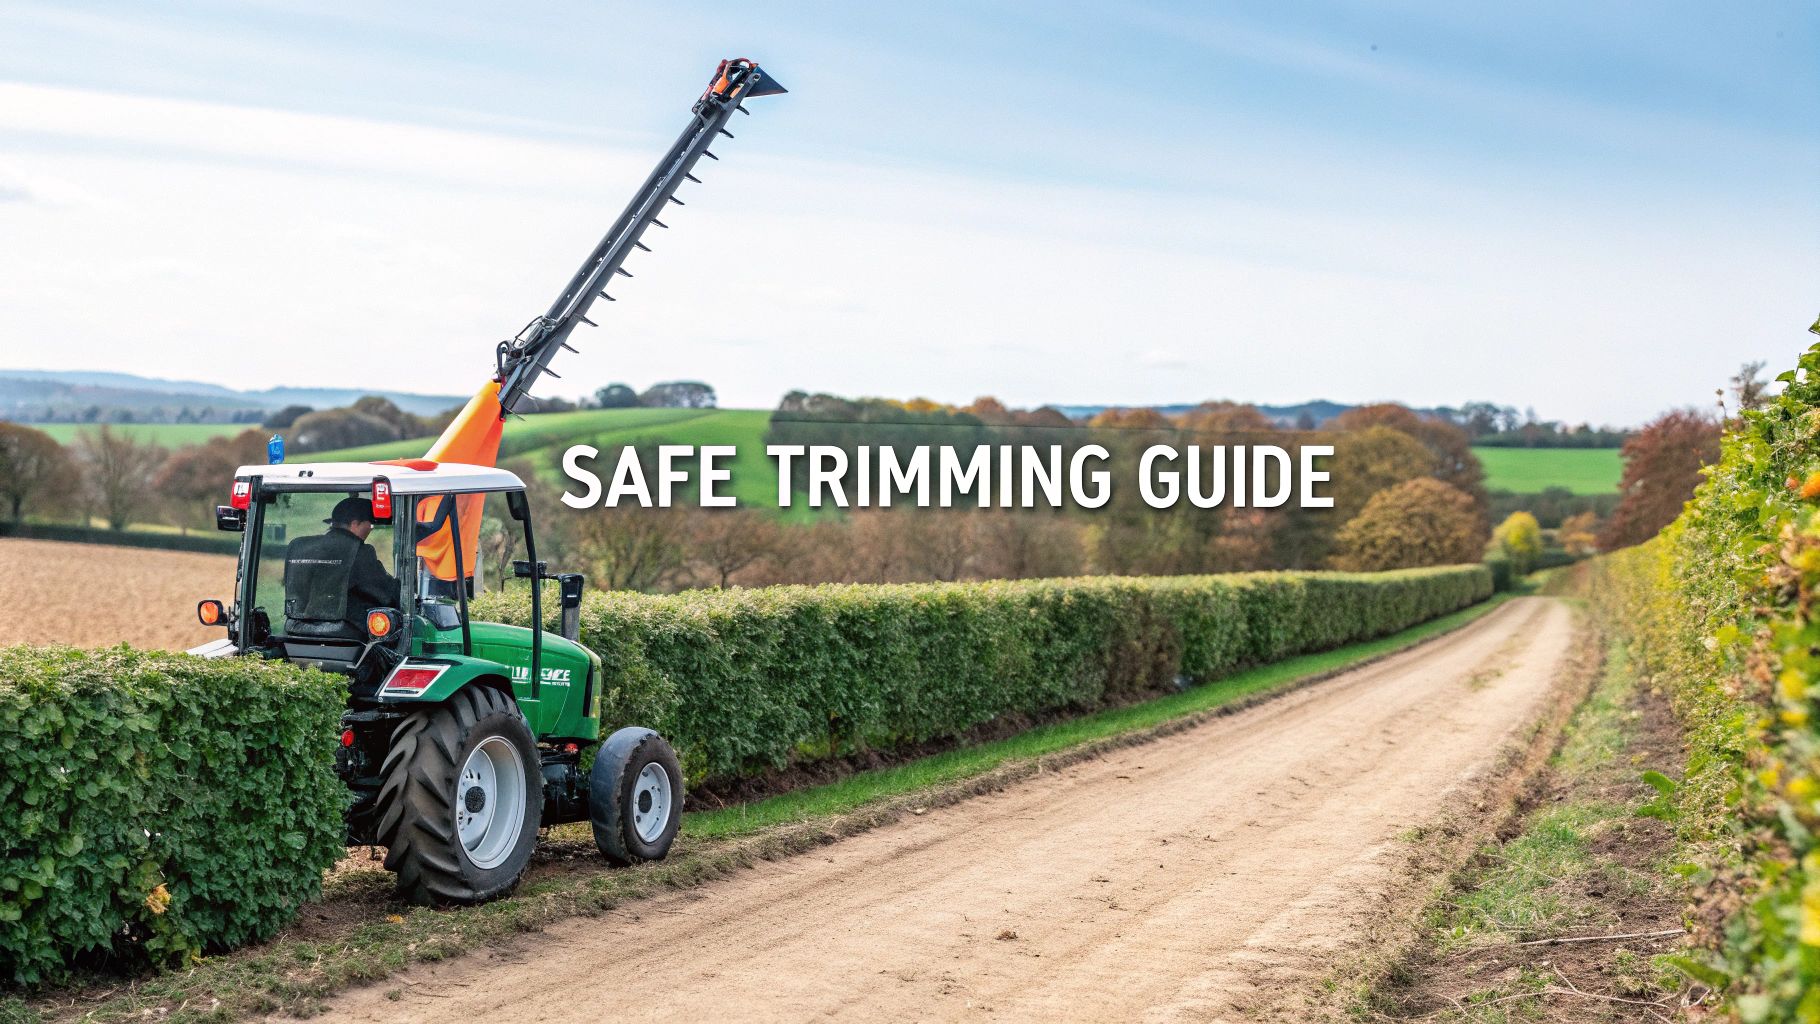
When you’re looking after a farm or a large estate, you know that hedgerows are more than just boundaries; they’re a constant job. A hedge trimmer attachment for your compact tractor is the tool that turns that mammoth task into something you can actually get done.
These attachments aren’t just bigger versions of handheld trimmers. They hook directly into your tractor’s own power systems, giving you the muscle needed to manage huge lengths of hedging far more efficiently than any standalone machine. For modern land management here in the UK, they’re an absolute game-changer.
Why a Hedge Trimmer Is Your Compact Tractor’s Best Partner
Let’s be honest, trying to keep hundreds of metres of dense, fast-growing hedgerow in check with handheld tools is a battle you’ll eventually lose. It’s a never-ending, back-breaking job. This is exactly where a hedge trimmer for a compact tractor shows its true colours, turning a ridiculously labour-intensive chore into a manageable part of your routine.
Compact tractors are the workhorses on so many British farms and smallholdings precisely because they’re so versatile. But the tractor itself is only half the story; its real strength comes from the attachments it can run. A hedge trimmer is probably one of the best examples of an attachment that massively expands what your tractor can do for you.
How Does It All Work? A Simple Explanation
So, how does the tractor actually bring the trimmer to life? It’s a clever combination of two of the tractor’s core systems.
-
Power Take-Off (PTO): The simplest way to think of the PTO is as a direct extension of the tractor’s engine. It’s that spinning shaft at the back that delivers raw, rotational power straight to the attachment. It’s what gives the cutter its ferocious bite.
-
Hydraulics: If the PTO is the brawn, the hydraulic system is the brain and the muscle control. It uses pressurised oil to move the trimmer’s arm, extend the reach, and angle the cutting head. This is what lets you position that powerful cutter with incredible precision, all without leaving your seat.
These two systems working together mean you can control a seriously heavy-duty cutting head on the end of a long-reach arm, placing it exactly where you need it from the safety and comfort of the cab. This partnership is what makes the whole setup so incredibly effective for getting at those tall, wide, or just plain awkward hedgerows.
By mechanising this essential task, farmers and land managers can maintain boundaries not just for aesthetic reasons, but to comply with agricultural schemes and promote biodiversity, all while saving countless hours and reducing physical strain.
Matching a Hedge Trimmer to Your Tractor’s Specifications
Choosing a hedge trimmer attachment for your compact tractor isn’t as simple as picking a tool off a shelf. It’s more like a matchmaking service for your machinery. Get the pairing right, and you’ve got a seamless, efficient setup. Get it wrong, and you’re looking at poor performance, potential damage to your tractor, and some serious safety risks.
Before you start browsing models, your first job is to grab your tractor’s operator manual. That document holds all the vital stats you’ll need to make sure the trimmer you choose will work in harmony with what your tractor can actually handle.
Understanding Hydraulic Flow and Pressure
The heart and soul of any hedge trimmer attachment is the hydraulic system. It’s what powers the arm’s movement, letting you position the cutter head precisely where you need it. For this to work properly, two numbers are absolutely critical: flow rate and pressure.
Think of it like a hosepipe. The flow rate, measured in litres per minute (LPM), is how much hydraulic oil your tractor’s pump can move. The pressure, measured in bar, is the force behind that oil. A decent hedge trimmer needs a good supply of both to move smoothly and cut effectively. If your tractor’s hydraulics can’t keep up, you’ll get jerky, sluggish movements and a painfully slow work rate.
This handy decision tree shows when a tractor-mounted trimmer is the right tool for the job.
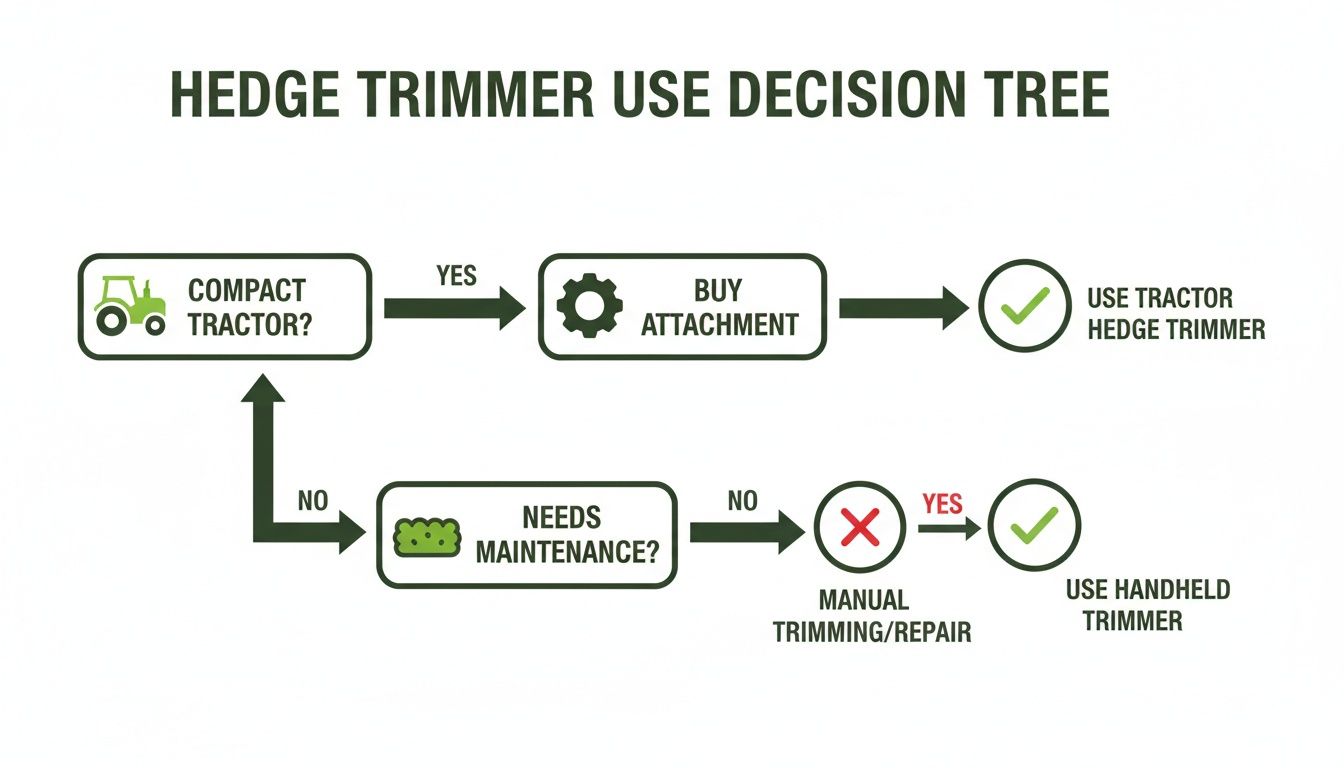
As you can see, if you have a compact tractor and a lot of hedgerows to get through, an attachment quickly becomes the most sensible choice.
The Non-Negotiable PTO Speed
While the hydraulics handle the arm, it’s the Power Take-Off (PTO) shaft that spins the cutting head. In the UK, compact tractors almost always have a PTO speed of either 540 RPM or 1000 RPM. This isn’t a “close enough” figure; it’s a strict requirement.
A word of caution: An attachment built for 540 RPM must be run at 540 RPM. If you connect it to a 1000 RPM setting, you’ll be spinning the cutter head nearly twice as fast as it was designed for. This is incredibly dangerous and can lead to catastrophic failure of the attachment. Always, always check and match the required PTO speed.
Tractor Weight and the Importance of Balance
Finally, don’t overlook the sheer physics of hanging a heavy attachment off the side of your tractor. A hedge trimmer, particularly one with a long reach, acts as a massive lever. It dramatically shifts your tractor’s centre of gravity, and without the right counterbalance, the risk of tipping over is very real—especially on the slopes and uneven ground common on British farms.
To help you get this right, we’ve put together a quick checklist. Run through these points before making any decisions.
Compact Tractor and Hedge Trimmer Compatibility Checklist
| Compatibility Check | What to Look For | Why It Matters |
|---|---|---|
| Hydraulic Flow (LPM) | Check your tractor’s manual for its hydraulic output. Compare it to the minimum LPM required by the hedge trimmer. | Too little flow results in slow, weak, and jerky movements of the trimmer arm, making precise cutting impossible. |
| Hydraulic Pressure (bar) | Find the tractor’s maximum system pressure in the manual. Ensure it meets or exceeds the trimmer’s operational pressure requirement. | Insufficient pressure means the trimmer won’t have the force to cut through thicker material or move effectively. |
| PTO Speed (RPM) | Confirm your tractor’s PTO speed (540 or 1000 RPM) and match it exactly to the attachment’s specification. | Mismatching the speed is extremely dangerous. It over-stresses the attachment’s gearbox and cutter, risking a major failure. |
| Tractor Weight & Stability | Consider the tractor’s total weight against the attachment’s weight and reach. Look into front weight blocks. | The attachment creates a significant off-centre load. Without a proper counterbalance, the tractor can easily become unstable and tip over. |
| Three-Point Linkage | Check if your tractor’s linkage category (Cat 1, Cat 2, etc.) matches the mounting frame of the hedge trimmer. | The three-point linkage is the physical connection. If they don’t match, you simply won’t be able to attach the trimmer securely. |
Getting these points sorted from the start will save you a world of trouble later on. A properly specified weighted front box isn’t just for holding tools; it’s an essential piece of safety equipment that anchors the tractor and keeps all four wheels planted firmly on the ground.
When you’re looking at options, remember that bespoke solutions like the SAMO Variochop are often designed with specific tractor models in mind, offering a more integrated and balanced fit from the get-go.
Choosing the Right Trimmer Head and Arm Reach
Once you’ve sorted the compatibility side of things, it’s time to focus on the business end of the machine: the cutter head. The type of head you choose for your hedge trimmer for a compact tractor makes a massive difference, dictating the finish you get and what sort of growth you can tackle. In reality, two main types dominate the market.
For those tough, overgrown agricultural hedgerows, a flail head is usually the weapon of choice. It’s a brute-force approach, using heavy, swinging blades (the flails) on a spinning drum. This setup is incredibly tough and will happily mulch thick branches, brambles, and dense scrub without breaking a sweat.
The trade-off? The finish it leaves behind is pretty rough. That’s fine for field boundaries where you just need to knock things back, but it’s not what you want for ornamental hedges that need to look sharp.
Sickle Bar Cutters for a Sharper Finish
If you’re looking after estate boundaries or formal landscapes, a sickle bar cutter is the way to go. Think of it like a giant set of barber’s clippers. It uses a set of blades that move back and forth, slicing through stems and leaves with precision.
This clean, slicing action gives a much tidier, manicured look that’s not only more professional but also healthier for the hedge. The downside is that sickle bars don’t take kindly to thick, woody material. Hitting stones or a bit of old fence wire can easily cause damage, so they’re much better suited to regular maintenance rather than hacking back a completely wild hedge.
To put it simply: a flail head is like a heavy-duty brush cutter, blasting through anything in its path. A sickle bar is a precision instrument, delivering a clean, sharp finish that’s perfect for well-kept hedgerows.
Why Arm Reach Is So Important
Of course, the best cutter head in the world is useless if you can’t get it where it needs to be. This is where ‘reach’ becomes a critical part of the equation. On UK farms, it’s not uncommon for hedgerows to tower six or even eight metres high. Trying to trim the top and the far side safely from the tractor cab is a real challenge.
An attachment with a 5-metre or 6-metre reach isn’t just a nice-to-have; for many, it’s an absolute necessity. It allows operators to shape the entire hedge quickly and safely, which is vital for meeting the requirements of modern sustainable farming schemes that put a real emphasis on well-managed field boundaries. For these demanding jobs, compact tractors equipped with attachments offering a 6m reach are often the ideal solution.
This constant push for efficiency has led to some fantastic innovations, with many operators now looking at advanced attachments from specialist manufacturers like Spapperi hedge trimmers.
Safe Operation and UK Legal Requirements
Running a hedge trimmer on a compact tractor isn’t just about getting the job done; it’s about getting it done safely and legally. Before you even think about turning the key, there are a few fundamental checks and bits of gear you need to sort out. It all starts with the right Personal Protective Equipment (PPE).
This is non-negotiable. As a bare minimum, you’ll need proper hearing protection against the constant drone of the engine and cutter. A good pair of safety glasses or a full visor is also essential to stop debris from flying into your eyes, and a solid pair of steel-toed boots will save your feet from any trouble.
Pre-Operational Safety Checks
Once you’re kitted out, the next job is to give your work area a proper once-over. It’s tempting to just jump in and get started, but taking five minutes to walk the hedge line can prevent a world of pain later on.
Keep a sharp eye out for hidden dangers that aren’t obvious from the driver’s seat:
- Overhead Power Lines: Spot them before you start. Getting a trimmer head tangled in live cables is a recipe for disaster, so know where they are and keep a very wide berth.
- Hidden Obstacles: Hedges can hide all sorts of nasty surprises. Look for old fence posts, stray bits of wire, or big stones that could wreck your cutter head or get flung out at serious speed.
- Ground Conditions: How stable is the ground you’ll be driving on? Soft verges, hidden ditches, or steep banks can easily unbalance a tractor and put you at risk of a rollover.
A tidy cab is a safe cab. It’s a simple rule but an important one. Tools, grease guns, or even a stray water bottle can roll underfoot and jam the pedals. A purpose-built front box is a great solution, giving you a secure spot to stow your gear, well away from the controls and the operator.
Understanding UK Hedgerow Cutting Regulations
On top of the practical safety side of things, you’ve got to be clued up on the UK’s laws for managing hedgerows. These regulations are primarily in place to protect nesting birds, and the authorities take them very seriously.
The key thing to remember is the dates. Under the Cross Compliance rules, it’s illegal to cut or trim the majority of countryside hedgerows between 1 March and 31 August. This window covers the main breeding season for most of our farmland birds.
Ignoring these dates can land you with some hefty penalties. It’s crucial to schedule your trimming work for the autumn and winter. By sticking to the rules, you not only stay on the right side of the law but also do your bit to preserve the vital wildlife corridors that our hedgerows represent. It’s always a good idea to check the latest government guidance, as there can sometimes be specific exemptions.
Getting Your Attachment Fitted and Keeping It in Top Nick
So, you’ve picked out the perfect hedge trimmer attachment for your compact tractor. The next job is getting it fitted properly and understanding the simple maintenance that’ll keep it earning its keep for years to come. A solid setup isn’t just about getting the best cut; it’s a massive part of operating safely.
Let’s walk through what you need to do.
Mounting the attachment for the first time might look a bit intimidating, but it’s just a matter of following the steps. It all starts with the tractor’s three-point linkage. Carefully back your tractor up, lining up the lower lift arms with the attachment’s mounting pins, and pop the linchpins in to secure them. With the lower arms sorted, you can hook up the top link to get the working angle just right.
Hooking Up the Hydraulics
Once the trimmer is physically latched on, you need to connect the hydraulics. Think of these hoses as the veins and arteries – they’re what give the arm and cutter head their power. Getting this bit right is non-negotiable.
Before you even think about touching a hose, make sure the tractor engine is off. It’s also wise to depressurise the system by giving the hydraulic levers a quick wiggle.
Always give the male and female connectors a thorough wipe-down before you couple them. You’d be amazed how much damage a tiny bit of grit can do to a hydraulic system over time. Once they’re clean, connect the hoses to the right spool valves on your tractor, making sure they click securely into place.
A classic mistake is getting the ‘flow’ and ‘return’ hoses mixed up. This can make the attachment behave erratically or simply refuse to work. Most systems are colour-coded or marked these days, but if you’re ever in doubt, your manual is your best friend.
A Quick Pre-Flight Check
Before you head out to the hedgerow, spending five minutes on a quick pre-use check can save you a world of pain later. It’s the best way to catch small issues before they become big, expensive ones.
- Check Hydraulic Oil: First things first, check the tractor’s hydraulic fluid level. Running it low can starve the pump, causing it to overheat and fail.
- Inspect Hoses: Give all the hydraulic hoses a good once-over. Look for any cracks, bulges, or leaks. A hose bursting under pressure is no joke.
- Grease Everything That Moves: A grease gun is your best friend here. Regular greasing of all the pivot points on the arm and head is the single most effective thing you can do to make your attachment last.
- Look at the Blades: Check the cutting blades for any dings, chips, or excessive wear. Sharp, healthy blades give a clean cut and put far less strain on the whole machine.
This simple routine is your ticket to a long and happy life with your attachment. And remember, for trickier repairs or if you need something custom-made, professional agricultural engineering services are there to help. By taking care of the basics, you’ll ensure your hedge trimmer for a compact tractor is a reliable workhorse, season after season.
The Advantage of British Manufacturing and Bespoke Solutions
When you’re in the market for a hedge trimmer for a compact tractor, there’s a strong case to be made for buying British. Equipment designed and built right here in the UK tends to be born from the real-world challenges of our own farms. The result is machinery that’s tougher, more practical, and simply better suited to our specific conditions.
This home-grown expertise means you’re getting a piece of kit that’s been put through its paces in our unpredictable weather and across our varied landscapes. On top of that, having local support for spare parts and servicing is a massive bonus. It can slash potential downtime compared to waiting for components to arrive from halfway around the world.
When Off-the-Shelf Simply Won’t Do
Standard, off-the-shelf attachments are fine for many, but they often come up short when you’re working with unique or older compact tractor models. Not every tractor has a standard mounting setup, and trying to find a secure and safe fit can quickly become a major headache.
This is where a bespoke solution isn’t just a nice-to-have; it’s essential. A generic, ill-fitting bracket is more than just inefficient—it’s dangerous. It can seriously compromise the tractor’s stability and put the operator at risk.
True integration isn’t just about making an attachment fit; it’s about making it work in perfect harmony with the tractor. A custom solution ensures every connection is secure, every angle is correct, and the overall balance is optimised for safe, effective operation.
Precision Engineering for a Perfect Fit
Fortunately, modern fabrication techniques offer a powerful answer to this problem. Precision engineering services, like CNC plasma cutting and custom fabrication, can create entirely bespoke mounting brackets from the ground up. This process lets us design components tailored to the exact specifications of your tractor, guaranteeing a perfect, secure fit every time.
This kind of customisation is what turns a good attachment into a great one. It also opens up possibilities for creating a fully integrated system. For example, a bespoke bracket can be designed to work seamlessly with other products like weighted front boxes, ensuring the whole setup—trimmer and counterbalance—functions as a single, balanced unit. It’s this holistic approach that really boosts your workflow efficiency and safety on the farm.
This drive for integrated, efficient solutions is a trend we’re seeing right across the industry. For farm managers and contractors, pairing a hedge trimmer with a compact tractor is a game-changer for boundary maintenance. With UK hedgerows covering 20% of farmland, keeping them in good shape is vital for biodiversity. As the market for agricultural hedge trimmers grows from £355.6 million in 2025, British manufacturers are increasingly focused on eco-conscious research and development. You can find more industry insights over at the Agricultural Engineers Association.
Got Questions? We’ve Got Answers
Getting to grips with new machinery always throws up a few questions. Let’s tackle some of the most common ones we hear about matching a hedge trimmer with a compact tractor.
What’s the Minimum Horsepower I Need?
You’ll find that most hedge trimmer attachments built for compact tractors are happiest with 20 to 40 horsepower (HP). Of course, this isn’t a hard and fast rule; it really depends on the specific trimmer’s size and heft.
The best advice is to always, always check the manufacturer’s specs for both your tractor and the attachment you’re eyeing up. Trying to run a trimmer on an underpowered tractor is a recipe for a bad day – you’ll get a poor cut and could end up straining your machine.
Can I Mount a Hedge Trimmer on My Front-End Loader?
Some trimmers are indeed designed to go on the front loader, but many others are built specifically for the three-point linkage at the back. It’s not a case of one-size-fits-all, and mixing and matching is a serious safety risk that can throw your tractor’s stability right out the window.
Make sure you buy a trimmer designed for how you plan to use it. And don’t forget the counterbalance.
A weighted front box, for example, is non-negotiable when you’re using a rear-mounted trimmer. It provides that essential stability to keep all four wheels on the ground, especially when you’re working on a slope or have the arm fully extended.
How Often Should I Be Sharpening the Blades?
If you’re using the trimmer professionally, it’s good practice to give the blades a quick look over every day. As for sharpening, a good rule of thumb is to do it weekly or after every 25-30 hours of use.
Sharp blades don’t just give you a much cleaner, healthier cut for the hedge; they also reduce the workload on your tractor’s hydraulics. Always stick to the manufacturer’s own guidelines for sharpening and general upkeep.
Do I Really Need to Add Weights to My Tractor?
In a word, yes. A hedge trimmer, particularly one with a long reach, puts a lot of weight and leverage on one side of your tractor. Without a proper counterbalance, you’re at a real risk of tipping over.
This is a safety essential, not an optional extra. Purpose-built front boxes are a brilliant solution. They anchor the front of the tractor down, giving you the stability and peace of mind you need to operate safely.
At JF Hudson Ltd, we design and manufacture durable, British-made attachments to help you get the most from your machinery.